Craving a healthier version of a classic favorite? Dive into the world of oven-fried chicken, a delightful dish that offers the crispy, flavorful experience of traditional fried chicken without the excess oil. This recipe uses a combination of buttermilk, seasoned breadcrumbs, and a touch of paprika to create a perfectly crunchy coating. Whether you’re serving it for a family dinner or a casual get-together, this oven-fried chicken is sure to be a hit.

Ingredients List
Chicken Ingredients
- 2 lbs chicken breasts (about 3-4), cut into strips
- 1 cup buttermilk (optional)
- 6 tbsp melted butter
- ¾ cup flour
- ½ cup Panko breadcrumbs
- 1 tbsp seasoning salt (I use Lawry’s)
- ½ tsp pepper
- 2 tsp paprika
Required Kitchen Tools
When preparing oven-fried chicken, having the right kitchen tools can make the process smoother and more enjoyable. Here are the essential tools you will need:
- Mixing Bowls: Several mixing bowls of various sizes for marinating and coating the chicken.
- Baking Sheets: Prepare baking sheets lined with parchment paper for baking the chicken strips.
- Wire Rack: A wire rack to elevate the chicken strips during baking for even crisping.
- Tongs: For handling the chicken strips during coating and baking.
Having these tools on hand will set you up for a successful oven-fried chicken-making experience.
Preparing the Chicken
To start, you’ll need to prepare the chicken by marinating it and getting it ready for coating.
Marinating the Chicken
- Cut the Chicken:
Begin by cutting 2 lbs of chicken breasts into strips. Aim to get about 3 strips from each breast, depending on their size. - Marinate in Buttermilk (Optional):
If using buttermilk, place the chicken strips in a large mixing bowl and pour 1 cup of buttermilk over them. Ensure the chicken is fully submerged. Cover the bowl and refrigerate for at least 30 minutes to tenderize and add flavor. This step is optional but recommended for extra juiciness.
Preparing the Coating
- Melt the Butter:
In a small bowl, melt 6 tbsp of butter. This will be used to help the coating adhere to the chicken and add richness. - Mix the Dry Ingredients:
In another mixing bowl, combine ¾ cup of flour, ½ cup of Panko breadcrumbs, 1 tbsp of seasoning salt, ½ tsp of pepper, and 2 tsp of paprika. Mix well to ensure the seasoning is evenly distributed.
Coating the Chicken
Now that our chicken is marinated and the coating is prepared, it’s time to coat the chicken strips to achieve that perfect, crispy exterior.
Coating the Chicken Strips
- Preheat the Oven:
Preheat your oven to 400°F (200°C). This ensures the oven is hot enough to create a crispy coating on the chicken. - Set Up the Coating Station:
Set up a coating station with the melted butter in one bowl and the dry coating mixture in another. Place a wire rack on top of a baking sheet lined with parchment paper. This setup allows the chicken to cook evenly and stay crispy. - Coat the Chicken Strips:
One by one, dip each chicken strip into the melted butter, ensuring it’s fully coated. Then, dredge the butter-coated chicken strip into the dry coating mixture, pressing gently to adhere the coating to the chicken. Ensure each strip is well-coated with the flour and breadcrumb mixture. - Place on Wire Rack:
After coating each strip, place it on the wire rack set over the baking sheet. Arrange the strips in a single layer with some space between them to ensure even cooking and crispiness.
Preparing for Baking
- Final Touches:
Once all the chicken strips are coated and placed on the wire rack, drizzle any remaining melted butter over the strips. This step helps achieve a golden, crispy crust. - Check for Even Coating:
Ensure all chicken strips are evenly coated and there are no bare spots. Adjust the coating as necessary before baking.
Baking the Chicken
Now that our chicken strips are coated and ready, it’s time to bake them to achieve that delicious, crispy texture.
Baking the Chicken Strips
- Bake in the Oven:
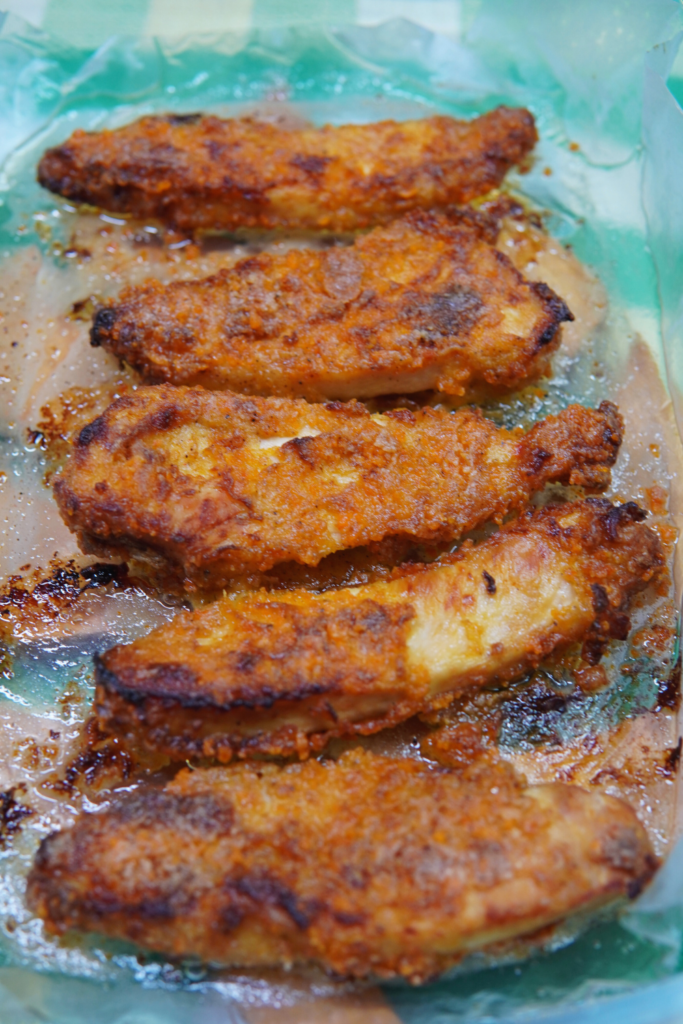
Place the baking sheet with the wire rack and coated chicken strips into the preheated oven. Bake at 400°F (200°C) for 20-25 minutes. - Check for Doneness:
After 20 minutes, check the chicken strips for doneness. They should be golden brown and crispy on the outside. Use a meat thermometer to ensure the internal temperature of the chicken reaches 165°F (74°C). If the chicken is not fully cooked or crispy enough, continue baking for an additional 5-10 minutes as needed. - Flip Halfway (Optional):
For extra crispiness, you can flip the chicken strips halfway through the baking time. This ensures even browning on both sides.
Cooling and Serving
- Cool Slightly:
Once the chicken strips are done baking, remove them from the oven and let them cool slightly on the wire rack for a few minutes. This helps the coating set and become even crispier. - Serve Hot:
Serve the oven-fried chicken strips hot, straight from the oven. They pair perfectly with your favorite dipping sauces, such as ranch, barbecue sauce, or honey mustard.
Serving and Storing
Now that our oven-fried chicken is perfectly baked and ready to enjoy, here are some serving suggestions and tips on how to store any leftovers.
Serving Suggestions
- Pair with Dipping Sauces:
Serve the crispy oven-fried chicken strips with a variety of dipping sauces. Some popular options include ranch, barbecue sauce, honey mustard, or a spicy sriracha mayo. - Side Dishes:
Complement your chicken strips with delicious side dishes such as coleslaw, mashed potatoes, or a fresh green salad. For a classic pairing, serve them with homemade fries or sweet potato fries. - Make it a Meal:
Turn your oven-fried chicken into a complete meal by serving it with a side of steamed vegetables and a dinner roll. This makes for a satisfying and balanced dinner. - Chicken Sandwich:
Use the oven-fried chicken strips to make a delicious chicken sandwich. Place them on a toasted bun with lettuce, tomato, pickles, and your favorite sauce for a quick and tasty meal.

Storage Instructions
- Refrigeration:
If you have any leftover chicken strips, let them cool completely before storing. Place them in an airtight container and refrigerate for up to 3 days. - Reheating:
To reheat the chicken strips and keep them crispy, preheat your oven to 375°F (190°C). Place the strips on a baking sheet and heat for about 10-15 minutes, or until they are warmed through. Avoid using the microwave as it can make the coating soggy. - Freezing:
For longer storage, you can freeze the cooked chicken strips. Place them on a baking sheet in a single layer and freeze until solid. Then, transfer the frozen strips to a freezer-safe bag or container. They can be stored in the freezer for up to 2 months. To reheat, bake them directly from frozen at 375°F (190°C) for 20-25 minutes.
Conclusion
Mastering the oven-fried chicken recipe opens up a world of delicious possibilities. This healthier alternative to traditional fried chicken delivers all the crispy, flavorful goodness without the excess oil. By following the detailed instructions provided, you can easily recreate this tasty dish in your own kitchen. Whether you serve it as a main course, a snack, or in a sandwich, oven-fried chicken is sure to be a hit with family and friends. Enjoy the satisfaction of a homemade meal that’s both delicious and nutritious. So, gather your ingredients, preheat your oven, and embark on a culinary journey to crispy, flavorful perfection.

